Marketplace: Creating plugins
A plugin connects ToolJet to an API or a database. Once installed, it appears as a datasource: users add their credentials in a connection form, then build queries against it from the query panel. Plugins are written in TypeScript and live in the marketplace/ directory of the ToolJet repository.
This guide walks you through building a plugin with the tooljet CLI, using two examples:
- Example 1: GitHub is the simplest plugin. It authenticates with a personal access token and uses GitHub's official SDK.
- Example 2: Twelve Data is a stock market data plugin. It calls a REST API directly, validates an API key and returns readable errors. It's closer to what you'd build for a production API.
GitHub and Twelve Data are only examples. Your plugin can connect to any API or database, and the steps are the same. To run an example yourself, you need its credentials: a GitHub personal access token for Example 1, which requires a GitHub account, or Twelve Data's public demo key for Example 2, which doesn't require an account. Pick the example closer to the service you plan to connect, or follow both.
Prerequisites
- Complete the Marketplace setup guide. You need ToolJet running locally with
ENABLE_MARKETPLACE_DEV_MODE=true, the marketplace packages built, and thetooljetCLI installed. - Run every
tooljetcommand from the root of the ToolJet repository. The CLI exits with an error if it can't find themarketplace/anddocs/directories.
How a Plugin Works
When you run tooljet plugin create, the CLI creates a plugin directory and registers the plugin in the marketplace list.
marketplace/plugins/<plugin-id>/
  package.json        # npm package, named @tooljet-marketplace/<plugin-id>
  tsconfig.json
  README.md
  __tests__/index.js
  lib/
    icon.svg          # Icon shown in the marketplace and datasource list
    manifest.json     # Connection form
    operations.json   # Query panel
    types.ts          # TypeScript types for the form values
    index.ts          # Query logic
| File | What it does |
|---|---|
manifest.json | Defines the connection form users fill in when they add the datasource, such as an API key field. source.options lists which of those values ToolJet stores encrypted. |
operations.json | Defines the query panel: the operations users can pick and the inputs each operation needs. |
types.ts | Types for the values from both forms. Each key in manifest.json becomes a field in SourceOptions, and each key in operations.json becomes a field in QueryOptions. |
index.ts | Exports a class that implements QueryService. ToolJet calls its run method to execute a query, and its testConnection method when a user clicks Test connection. |
The CLI also adds an entry for the plugin to server/src/assets/marketplace/plugins.json. This file is the list of plugins shown under Integrations > Marketplace. Listing a plugin there doesn't install it: you still install it from the marketplace before you can use it.
The CLI fills in the entry's name with the plugin ID, not the display name you enter, and sets a generic description. Edit name, description and tags by hand to change how the plugin's card looks. Don't change id, because it must match the plugin directory name.
Form Field Types
manifest.json and operations.json use the same schema. Each field is an object with a label, a key (the property name your code reads) and a type:
| Type | Renders |
|---|---|
text | Single-line text input |
password | Masked input for secrets such as tokens and API keys |
textarea | Multi-line text input |
toggle | On/off switch |
dropdown | Single-select dropdown. Define the choices in list. |
dropdown-component-flip | A dropdown that changes which fields are shown. Each value in its list matches a sibling property holding the fields for that choice. Use it for choosing an auth method or an operation. |
codehinter | Input that resolves {{ }} expressions, so users can pass values from components and other queries. Use it for query inputs in operations.json. |
react-component-headers | Key-value editor for HTTP headers |
To show help text below a field, add help_text. On password fields, description isn't displayed, because the field shows a masked placeholder instead.
Example 1: Build a GitHub Plugin
This plugin authenticates with a GitHub personal access token and supports four operations: get user info, get a repository, list a repository's issues and list its pull requests.
To run your finished plugin, you need a GitHub personal access token. Querying public repositories only needs a token with no extra permissions.
Step 1: Create the Plugin
ToolJet already ships a GitHub plugin with the ID github, and the CLI rejects IDs that already exist, so use a different ID such as mygithub. Use lowercase letters and numbers only, because the CLI uses the ID in the package name and the class name.
tooljet plugin create mygithub
When prompted:
- Enter plugin display name:
My GitHub - Select a type:
api
Step 2: Define the Connection Form
Replace the contents of marketplace/plugins/mygithub/lib/manifest.json with:
{
  "$schema": "https://raw.githubusercontent.com/ToolJet/ToolJet/develop/plugins/schemas/manifest.schema.json",
  "title": "My GitHub datasource",
  "description": "A schema defining My GitHub datasource",
  "type": "api",
  "source": {
    "name": "My GitHub",
    "kind": "mygithub",
    "exposedVariables": {
      "isLoading": false,
      "data": {},
      "rawData": {}
    },
    "options": {
      "auth_type": {
        "type": "string"
      },
      "personal_token": {
        "type": "string",
        "encrypted": true
      }
    }
  },
  "defaults": {
    "auth_type": {
      "value": "personal_access_token"
    }
  },
  "properties": {
    "credentials": {
      "label": "Authentication",
      "key": "auth_type",
      "type": "dropdown-component-flip",
      "description": "Single select dropdown for choosing credentials",
      "list": [
        {
          "value": "personal_access_token",
          "name": "Use Personal Access Token"
        }
      ]
    },
    "personal_access_token": {
      "token": {
        "label": "Token",
        "key": "personal_token",
        "type": "password",
        "description": "Enter your personal access token",
        "help_text": "You can generate a personal access token from your GitHub account settings."
      }
    }
  },
  "required": []
}
source.optionsmarkspersonal_tokenasencrypted, so ToolJet stores the token encrypted. Any secret your plugin collects must be listed here with"encrypted": true.credentialsis adropdown-component-flipwith the keyauth_type. The value of each choice (personal_access_token) matches the property holding that choice's fields. Adding another auth method later means adding a choice tolistand a matching property.defaultspreselects the only auth method, so users only see the token field.
Step 3: Define the Query Panel
Replace the contents of marketplace/plugins/mygithub/lib/operations.json with:
{
  "$schema": "https://raw.githubusercontent.com/ToolJet/ToolJet/develop/plugins/schemas/operations.schema.json",
  "title": "My GitHub datasource",
  "description": "A schema defining My GitHub datasource",
  "type": "api",
  "defaults": {},
  "properties": {
    "operation": {
      "label": "Operation",
      "key": "operation",
      "type": "dropdown-component-flip",
      "description": "Single select dropdown for operation",
      "list": [
        {
          "value": "get_user_info",
          "name": "Get user info"
        },
        {
          "value": "get_repo",
          "name": "Get repository"
        },
        {
          "value": "get_repo_issues",
          "name": "Get repository issues"
        },
        {
          "value": "get_repo_pull_requests",
          "name": "Get repository pull requests"
        }
      ]
    },
    "get_user_info": {
      "username": {
        "label": "Username",
        "key": "username",
        "type": "codehinter",
        "lineNumbers": false,
        "description": "Enter username",
        "width": "320px",
        "height": "36px",
        "className": "codehinter-plugins",
        "placeholder": "Enter username"
      }
    },
    "get_repo": {
      "owner": {
        "label": "Owner",
        "key": "owner",
        "type": "codehinter",
        "lineNumbers": false,
        "description": "Enter owner name",
        "width": "320px",
        "height": "36px",
        "className": "codehinter-plugins",
        "placeholder": "developer"
      },
      "repo": {
        "label": "Repository",
        "key": "repo",
        "type": "codehinter",
        "lineNumbers": false,
        "description": "Enter repository name",
        "width": "320px",
        "height": "36px",
        "className": "codehinter-plugins",
        "placeholder": "tooljet"
      }
    },
    "get_repo_issues": {
      "owner": {
        "label": "Owner",
        "key": "owner",
        "type": "codehinter",
        "lineNumbers": false,
        "description": "Enter owner name",
        "width": "320px",
        "height": "36px",
        "className": "codehinter-plugins",
        "placeholder": "developer"
      },
      "repo": {
        "label": "Repository",
        "key": "repo",
        "type": "codehinter",
        "lineNumbers": false,
        "description": "Enter repository name",
        "width": "320px",
        "height": "36px",
        "className": "codehinter-plugins",
        "placeholder": "tooljet"
      },
      "state": {
        "label": "State",
        "key": "state",
        "className": "codehinter-plugins col-4",
        "type": "dropdown",
        "description": "Single select dropdown for choosing state",
        "list": [
          {
            "value": "open",
            "name": "Open"
          },
          {
            "value": "closed",
            "name": "Closed"
          },
          {
            "value": "all",
            "name": "All"
          }
        ]
      }
    },
    "get_repo_pull_requests": {
      "owner": {
        "label": "Owner",
        "key": "owner",
        "type": "codehinter",
        "lineNumbers": false,
        "description": "Enter owner name",
        "width": "320px",
        "height": "36px",
        "className": "codehinter-plugins",
        "placeholder": "developer"
      },
      "repo": {
        "label": "Repository",
        "key": "repo",
        "type": "codehinter",
        "lineNumbers": false,
        "description": "Enter repository name",
        "width": "320px",
        "height": "36px",
        "className": "codehinter-plugins",
        "placeholder": "tooljet"
      },
      "state": {
        "label": "State",
        "key": "state",
        "type": "dropdown",
        "className": "codehinter-plugins col-4",
        "description": "Single select dropdown for choosing state",
        "list": [
          {
            "value": "open",
            "name": "Open"
          },
          {
            "value": "closed",
            "name": "Closed"
          },
          {
            "value": "all",
            "name": "All"
          }
        ]
      }
    }
  }
}
The operation dropdown works like the auth dropdown in Step 2: each operation's value matches the property holding its inputs. Operations can share input keys, such as owner and repo.
Step 4: Define the Types
The CLI creates types.ts with only an operation field. Replace the contents of marketplace/plugins/mygithub/lib/types.ts with types that match the keys from Steps 2 and 3:
export type SourceOptions = {
  auth_type: string;
  personal_token: string;
};

export type QueryOptions = {
  operation: Operation;
  username?: string;
  repo?: string;
  owner?: string;
  state?: 'open' | 'closed' | 'all';
};

export enum Operation {
  GetUserInfo = 'get_user_info',
  GetRepo = 'get_repo',
  GetRepoIssues = 'get_repo_issues',
  GetRepoPullRequests = 'get_repo_pull_requests',
}
Step 5: Install the GitHub SDK
Plugins can use any npm package. Install packages from the marketplace/ directory with the --workspace flag, using the plugin's package name from its package.json:
cd marketplace
npm i octokit --workspace=@tooljet-marketplace/mygithub
Check that octokit now appears under dependencies in marketplace/plugins/mygithub/package.json. If a package is missing from that list, the build can still pass on your machine, because the marketplace shares one node_modules directory across plugins, but it fails on other machines.
Step 6: Write the Query Functions
Create marketplace/plugins/mygithub/lib/query_operations.ts with one function per operation:
import { Octokit } from 'octokit';
import { QueryOptions } from './types';

export async function getUserInfo(octokit: Octokit, options: QueryOptions): Promise<object> {
  const { data } = await octokit.request('GET /users/{username}', {
    username: options.username,
  });
  return data;
}

export async function getRepo(octokit: Octokit, options: QueryOptions): Promise<object> {
  const { data } = await octokit.request('GET /repos/{owner}/{repo}', {
    owner: options.owner,
    repo: options.repo,
  });
  return data;
}

export async function getRepoIssues(octokit: Octokit, options: QueryOptions): Promise<object> {
  const { data } = await octokit.request('GET /repos/{owner}/{repo}/issues', {
    owner: options.owner,
    repo: options.repo,
    state: options.state || 'all',
  });
  return data;
}

export async function getRepoPullRequests(octokit: Octokit, options: QueryOptions): Promise<object> {
  const { data } = await octokit.request('GET /repos/{owner}/{repo}/pulls', {
    owner: options.owner,
    repo: options.repo,
    state: options.state || 'all',
  });
  return data;
}
Step 7: Implement the Query Service
Replace the contents of marketplace/plugins/mygithub/lib/index.ts with:
import { QueryError, QueryResult, QueryService, ConnectionTestResult } from '@tooljet-marketplace/common';
import { SourceOptions, QueryOptions, Operation } from './types';
import { Octokit } from 'octokit';
import { getUserInfo, getRepo, getRepoIssues, getRepoPullRequests } from './query_operations';

export default class Mygithub implements QueryService {
  async run(sourceOptions: SourceOptions, queryOptions: QueryOptions, dataSourceId: string): Promise<QueryResult> {
    const octokit = await this.getConnection(sourceOptions);
    let result = {};

    try {
      switch (queryOptions.operation) {
        case Operation.GetUserInfo:
          result = await getUserInfo(octokit, queryOptions);
          break;
        case Operation.GetRepo:
          result = await getRepo(octokit, queryOptions);
          break;
        case Operation.GetRepoIssues:
          result = await getRepoIssues(octokit, queryOptions);
          break;
        case Operation.GetRepoPullRequests:
          result = await getRepoPullRequests(octokit, queryOptions);
          break;
        default:
          throw new QueryError('Query could not be completed', 'Invalid operation', {});
      }
    } catch (error) {
      throw new QueryError('Query could not be completed', error.message, {});
    }

    return { status: 'ok', data: result };
  }

  async testConnection(sourceOptions: SourceOptions): Promise<ConnectionTestResult> {
    const octokit = await this.getConnection(sourceOptions);
    try {
      await octokit.rest.users.getAuthenticated();
      return { status: 'ok' };
    } catch (error) {
      return { status: 'failed', message: 'Invalid credentials' };
    }
  }

  async getConnection(sourceOptions: SourceOptions): Promise<Octokit> {
    return new Octokit({ auth: sourceOptions.personal_token });
  }
}
runreceives the connection form values assourceOptionsand the query panel values asqueryOptions, calls the matching query function, and returns the result asdata.testConnectionruns when a user clicks Test connection. It fetches the authenticated user, which fails if the token is invalid.getConnectioncreates an authenticated Octokit client from the saved token.
If your API has no way to test a connection, add "customTesting": true to source in manifest.json. The connection form then shows no Test connection button.
Step 8: Build, Install and Test
-
Build the plugin from the
marketplace/directory:npm run build --workspace=@tooljet-marketplace/mygithub -
In ToolJet, go to Integrations > Marketplace and click Install on the mygithub card. The card shows the plugin ID until you edit its
nameinplugins.json.tipIf the plugin doesn't appear, hard-refresh the page (Cmd+Shift+R on macOS, Ctrl+Shift+R on Windows and Linux). Browsers cache the marketplace list, so a normal refresh can show an old copy.
-
Add a mygithub datasource, paste your token and click Test connection.
-
Create a query with the datasource, select Get repository, set Owner to
ToolJetand Repository toToolJet, and click Run. The query returns the repository's details.
Example 2: Build a Twelve Data Plugin
This plugin connects to Twelve Data, a stock and currency market data API, and supports three operations: get a stock quote, get a price time series and get a currency exchange rate. It builds on Example 1 and shows how to:
- Call a REST API directly with an HTTP client instead of a vendor SDK.
- Validate an API key in
testConnection. - Return the API's error messages to users.
To run your finished plugin, use Twelve Data's public demo API key. It returns data for the AAPL stock symbol and the EUR/USD currency pair only. For other symbols, get a free API key from Twelve Data.
Step 1: Create the Plugin
tooljet plugin create twelvedata
When prompted:
- Enter plugin display name:
Twelve Data - Select a type:
api
Step 2: Define the Connection Form
This API has one auth method, so the form needs a single password field and no auth dropdown. Replace the contents of marketplace/plugins/twelvedata/lib/manifest.json with:
{
  "$schema": "https://raw.githubusercontent.com/ToolJet/ToolJet/develop/plugins/schemas/manifest.schema.json",
  "title": "Twelve Data datasource",
  "description": "A schema defining Twelve Data datasource",
  "type": "api",
  "source": {
    "name": "Twelve Data",
    "kind": "twelvedata",
    "exposedVariables": {
      "isLoading": false,
      "data": {},
      "rawData": {}
    },
    "options": {
      "api_key": {
        "type": "string",
        "encrypted": true
      }
    }
  },
  "defaults": {},
  "properties": {
    "api_key": {
      "label": "API key",
      "key": "api_key",
      "type": "password",
      "description": "Enter your Twelve Data API key",
      "help_text": "Use demo to try the plugin. The demo key only returns data for AAPL and EUR/USD."
    }
  },
  "required": ["api_key"]
}
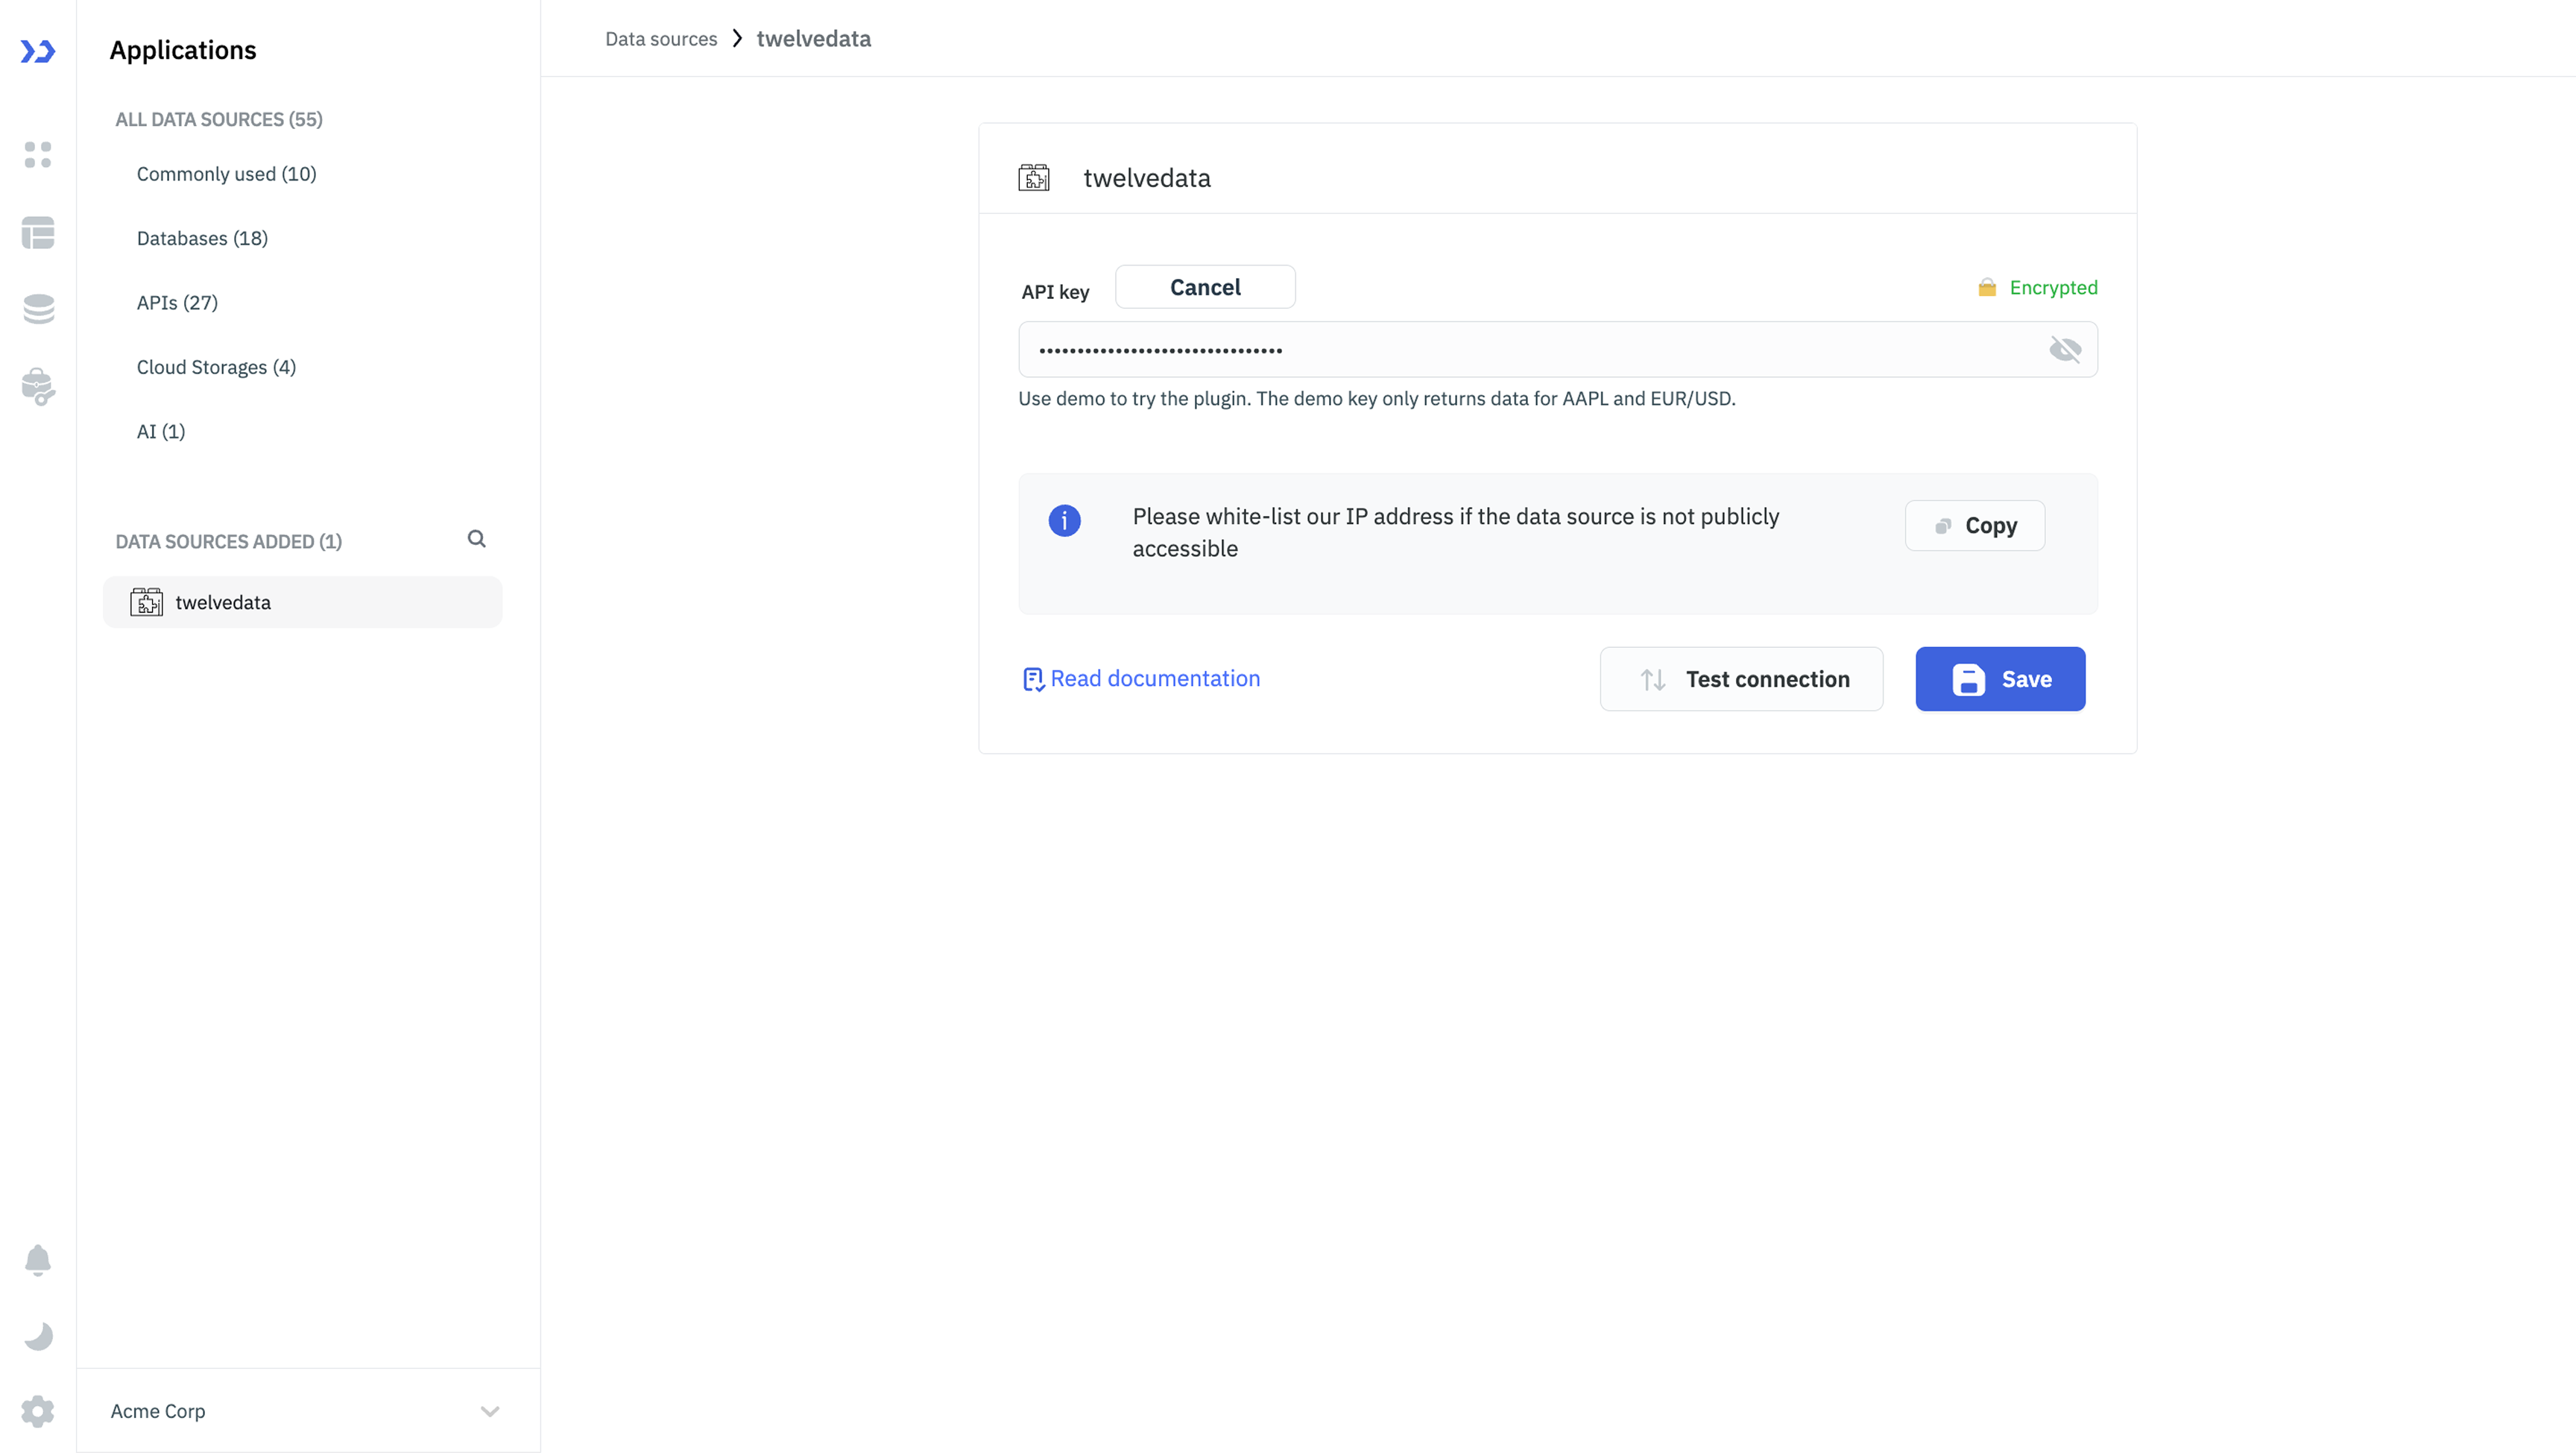
ToolJet renders this as a connection form with a masked API key field, its help text and an Encrypted badge:
Step 3: Define the Query Panel
Replace the contents of marketplace/plugins/twelvedata/lib/operations.json with:
{
  "$schema": "https://raw.githubusercontent.com/ToolJet/ToolJet/develop/plugins/schemas/operations.schema.json",
  "title": "Twelve Data datasource",
  "description": "A schema defining Twelve Data datasource",
  "type": "api",
  "defaults": {},
  "properties": {
    "operation": {
      "label": "Operation",
      "key": "operation",
      "type": "dropdown-component-flip",
      "description": "Single select dropdown for operation",
      "list": [
        {
          "value": "get_quote",
          "name": "Get quote"
        },
        {
          "value": "get_time_series",
          "name": "Get time series"
        },
        {
          "value": "get_exchange_rate",
          "name": "Get exchange rate"
        }
      ]
    },
    "get_quote": {
      "symbol": {
        "label": "Symbol",
        "key": "symbol",
        "type": "codehinter",
        "lineNumbers": false,
        "description": "Stock symbol, for example AAPL",
        "width": "320px",
        "height": "36px",
        "className": "codehinter-plugins",
        "placeholder": "AAPL"
      }
    },
    "get_time_series": {
      "symbol": {
        "label": "Symbol",
        "key": "symbol",
        "type": "codehinter",
        "lineNumbers": false,
        "description": "Stock symbol, for example AAPL",
        "width": "320px",
        "height": "36px",
        "className": "codehinter-plugins",
        "placeholder": "AAPL"
      },
      "interval": {
        "label": "Interval",
        "key": "interval",
        "type": "dropdown",
        "className": "codehinter-plugins col-4",
        "description": "Time between data points",
        "list": [
          { "value": "1min", "name": "1 minute" },
          { "value": "15min", "name": "15 minutes" },
          { "value": "1h", "name": "1 hour" },
          { "value": "1day", "name": "1 day" },
          { "value": "1week", "name": "1 week" }
        ]
      },
      "outputsize": {
        "label": "Number of data points",
        "key": "outputsize",
        "type": "codehinter",
        "lineNumbers": false,
        "description": "How many data points to return, up to 5000",
        "width": "320px",
        "height": "36px",
        "className": "codehinter-plugins",
        "placeholder": "30"
      }
    },
    "get_exchange_rate": {
      "currency_pair": {
        "label": "Currency pair",
        "key": "currency_pair",
        "type": "codehinter",
        "lineNumbers": false,
        "description": "Currency pair, for example EUR/USD",
        "width": "320px",
        "height": "36px",
        "className": "codehinter-plugins",
        "placeholder": "EUR/USD"
      }
    }
  }
}
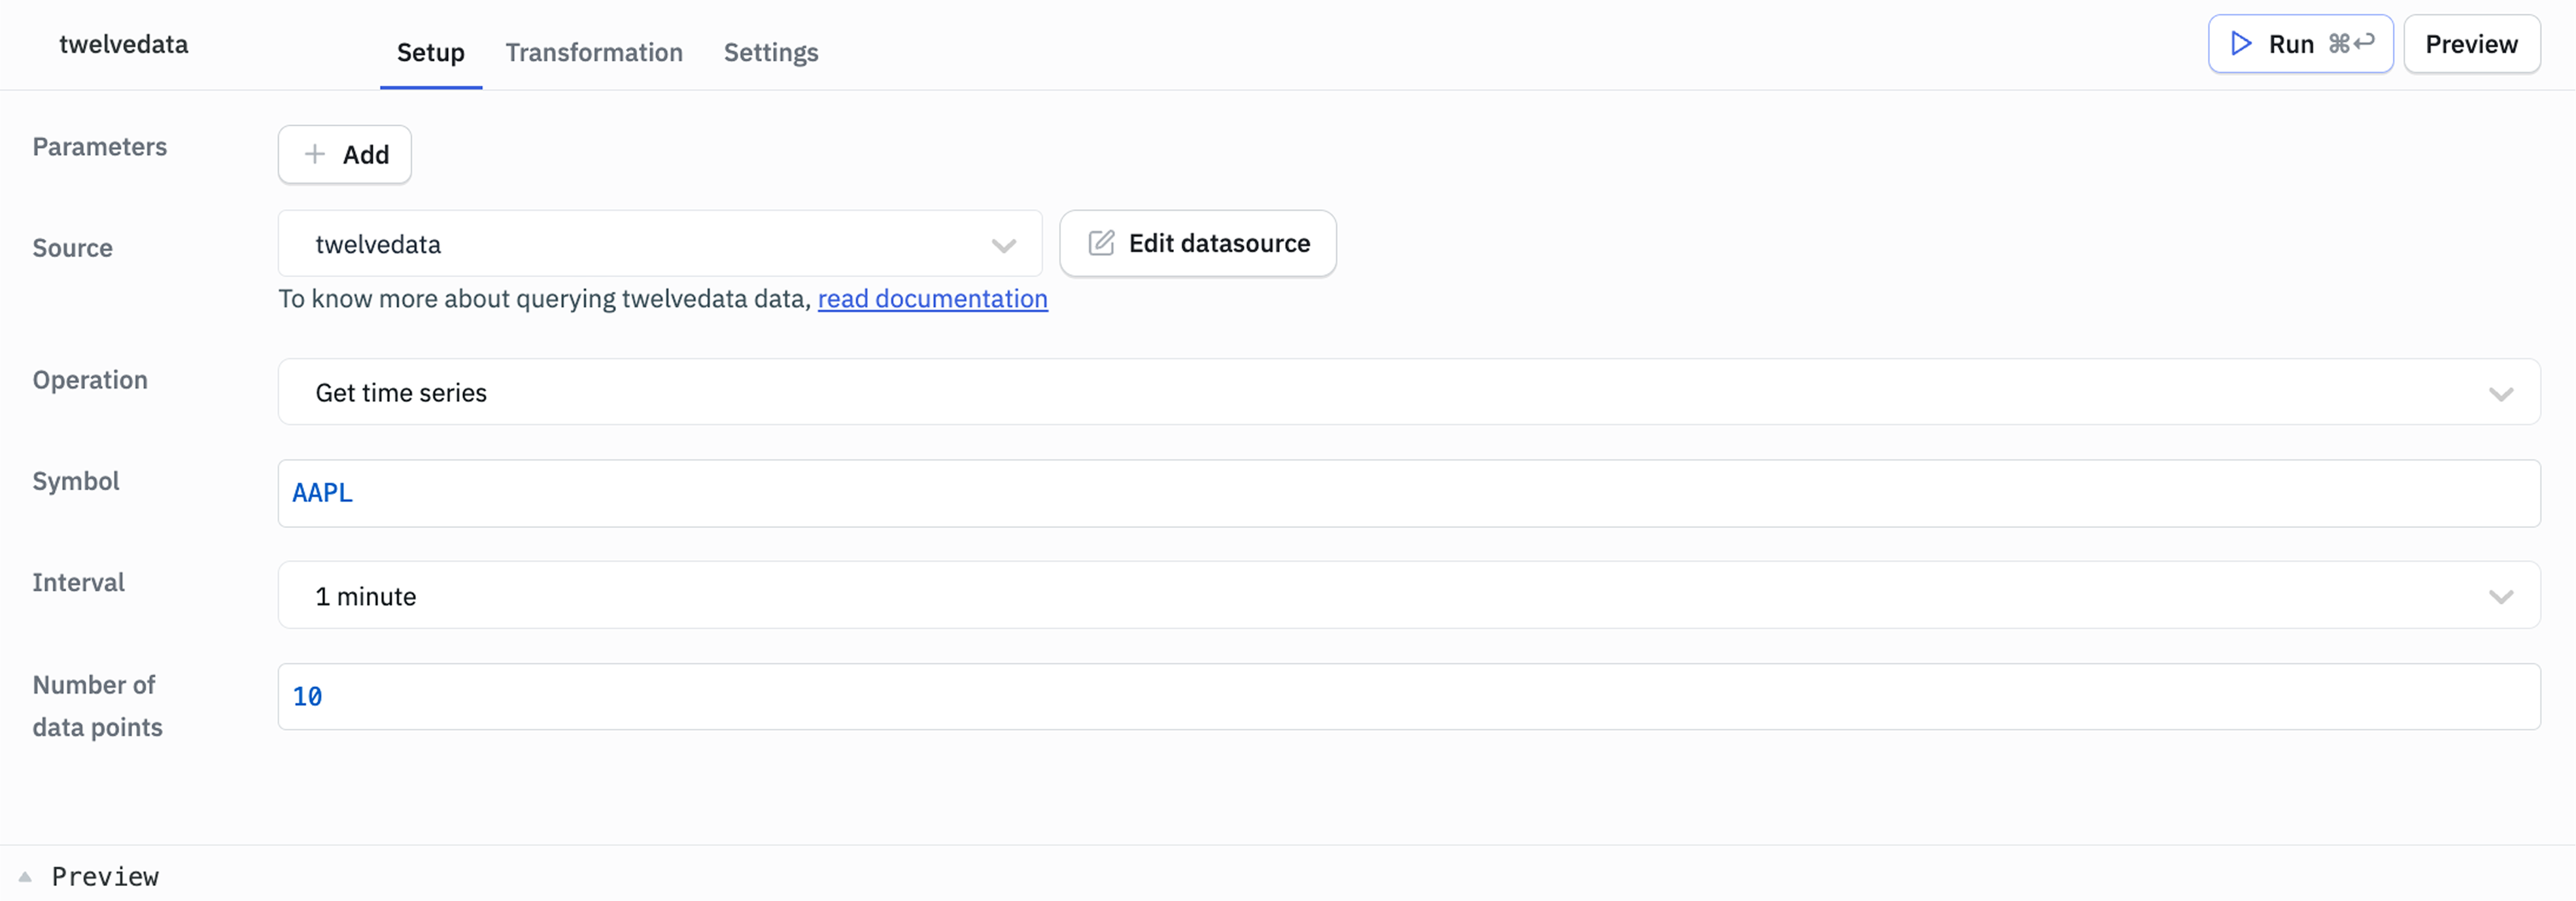
In the query panel, the Operation dropdown shows the inputs for the selected operation. For Get time series, that's Symbol, Interval and Number of data points:
Step 4: Define the Types
Replace the contents of marketplace/plugins/twelvedata/lib/types.ts with:
export type SourceOptions = {
  api_key: string;
};

export type QueryOptions = {
  operation: Operation;
  symbol?: string;
  interval?: string;
  outputsize?: string;
  currency_pair?: string;
};

export enum Operation {
  GetQuote = 'get_quote',
  GetTimeSeries = 'get_time_series',
  GetExchangeRate = 'get_exchange_rate',
}
Step 5: Install an HTTP Client
This plugin uses got to make HTTP requests. From the marketplace/ directory, run:
cd marketplace
npm i got@14 --workspace=@tooljet-marketplace/twelvedata
Install got@14, not the latest version. Newer major versions use JavaScript syntax that the marketplace's build tool (ncc) can't parse, and the build fails with Module parse failed: Invalid regular expression flag.
Step 6: Write the Query Functions
Create marketplace/plugins/twelvedata/lib/query_operations.ts. All three operations call the same API with different paths and parameters, so a shared callTwelveData helper sends the request and attaches the API key:
import got from 'got';
import { SourceOptions, QueryOptions } from './types';

const BASE_URL = 'https://api.twelvedata.com';

export async function callTwelveData(
  sourceOptions: SourceOptions,
  path: string,
  searchParams: Record<string, string> = {}
): Promise<any> {
  const data: any = await got(`${BASE_URL}/${path}`, {
    headers: { Authorization: `apikey ${sourceOptions.api_key}` },
    searchParams,
  }).json();

  // Twelve Data can report some errors in the response body instead of the HTTP status
  if (data?.status === 'error') {
    throw new Error(data.message);
  }
  return data;
}

export function getQuote(sourceOptions: SourceOptions, options: QueryOptions) {
  return callTwelveData(sourceOptions, 'quote', { symbol: options.symbol });
}

export function getTimeSeries(sourceOptions: SourceOptions, options: QueryOptions) {
  return callTwelveData(sourceOptions, 'time_series', {
    symbol: options.symbol,
    interval: options.interval || '1day',
    outputsize: options.outputsize || '30',
  });
}

export function getExchangeRate(sourceOptions: SourceOptions, options: QueryOptions) {
  return callTwelveData(sourceOptions, 'exchange_rate', { symbol: options.currency_pair });
}
getTimeSeries falls back to daily data points and 30 results when the user leaves those inputs empty.
Step 7: Implement the Query Service
Replace the contents of marketplace/plugins/twelvedata/lib/index.ts with:
import { QueryError, QueryResult, QueryService, ConnectionTestResult } from '@tooljet-marketplace/common';
import { SourceOptions, QueryOptions, Operation } from './types';
import { callTwelveData, getQuote, getTimeSeries, getExchangeRate } from './query_operations';

export default class TwelveData implements QueryService {
  async run(sourceOptions: SourceOptions, queryOptions: QueryOptions, dataSourceId: string): Promise<QueryResult> {
    let result = {};

    try {
      switch (queryOptions.operation) {
        case Operation.GetQuote:
          result = await getQuote(sourceOptions, queryOptions);
          break;
        case Operation.GetTimeSeries:
          result = await getTimeSeries(sourceOptions, queryOptions);
          break;
        case Operation.GetExchangeRate:
          result = await getExchangeRate(sourceOptions, queryOptions);
          break;
        default:
          throw new Error(`Unsupported operation: ${queryOptions.operation}`);
      }
    } catch (error) {
      const { message, details } = parseError(error);
      throw new QueryError('Query could not be completed', message, details);
    }

    return { status: 'ok', data: result };
  }

  async testConnection(sourceOptions: SourceOptions): Promise<ConnectionTestResult> {
    try {
      // /api_usage needs a valid key and doesn't count towards your request limit
      await callTwelveData(sourceOptions, 'api_usage');
      return { status: 'ok' };
    } catch (error) {
      return { status: 'failed', message: parseError(error).message };
    }
  }
}

// Turns a failed request into a readable message plus details for the error preview
function parseError(error: any): { message: string; details: Record<string, unknown> } {
  const statusCode = error?.response?.statusCode;
  let message = error?.message || 'An unknown error occurred';

  try {
    const body = JSON.parse(error?.response?.body);
    if (body?.message) message = body.message;
  } catch {
    // The response body wasn't JSON, keep the original message
  }

  return { message, details: { statusCode: statusCode || null, code: error?.code || null } };
}
testConnectioncalls Twelve Data's/api_usageendpoint, which fails with an HTTP 401 for an invalid key. The API's error message is shown to the user, so they know what to fix.parseErrorreads the error message from the API's response body. Without it, users would only see a generic HTTP error such asResponse code 401 (Unauthorized).
How Errors Appear in ToolJet
When run throws a QueryError, ToolJet shows its three arguments in the query's error preview:
QueryError argument | Shown as | In this plugin |
|---|---|---|
First (message) | message | Query could not be completed |
Second (description) | description | The error message from the Twelve Data API |
Third (data) | data | The HTTP status code and error code |
For example, requesting a quote for MSFT with the demo key returns:
{
  "status": "failed",
  "message": "Query could not be completed",
  "description": "The 'demo' API key is only used for initial familiarity. To become a full user, you can request your own API key at https://twelvedata.com/pricing. ...",
  "data": {
    "statusCode": 401,
    "code": "ERR_NON_2XX_3XX_RESPONSE"
  }
}
Put details that help users fix the problem in description and data, such as the API's own error message and codes. Don't include credentials or request headers.
Step 8: Build, Install and Test
-
Build the plugin from the
marketplace/directory:npm run build --workspace=@tooljet-marketplace/twelvedata -
In ToolJet, go to Integrations > Marketplace and click Install on the twelvedata card. If it doesn't appear, hard-refresh the page.
-
Add a twelvedata datasource, enter
demoas the API key and click Test connection. The test succeeds. Try an invalid key to see the failure message. -
Create a query with the datasource and run each operation:
- Get quote with symbol
AAPLreturns the latest price, change and volume. - Get time series with symbol
AAPLand interval 1 day returns the last 30 daily prices. - Get exchange rate with currency pair
EUR/USDreturns the current rate.
- Get quote with symbol
-
Run Get quote with symbol
MSFTto see the error preview from the previous step.
Update a Plugin While Developing
After you change a plugin's code or JSON files:
- Rebuild the plugin with
npm run build --workspace=@tooljet-marketplace/<plugin-id>. - Go to Integrations > Installed and click the reload button on the plugin's card.
ToolJet stores a copy of the plugin when you install it, so your changes don't take effect until you reload. You don't need to restart the ToolJet server. The reload button appears only when ENABLE_MARKETPLACE_DEV_MODE is true.
Your editor may show Parsing error: ESLint was configured to run on <tsconfigRootDir>/lib/... in plugin files. This comes from the repository's root ESLint configuration and doesn't affect the build. To lint a plugin, run ESLINT_USE_FLAT_CONFIG=false npx eslint plugins/<plugin-id>/lib from the marketplace/ directory.
Delete a Plugin
From the root of the ToolJet repository, run:
tooljet plugin delete <plugin-id>
When the CLI asks Is this a marketplace plugin?, select Yes. The CLI deletes the plugin directory and removes its entry from plugins.json. If you installed the plugin, also remove it from Integrations > Installed.
Publish a Plugin
Publishing is optional: a plugin works on your local instance without it. To make your plugin available to all ToolJet users, open a pull request with your plugin on the ToolJet GitHub repository. Before you do, update its entry in plugins.json with a clear name, description and tags. The ToolJet team reviews the pull request, and approved plugins are published in a later release.
For more complete examples, browse the plugins in marketplace/plugins/, such as github.
Need Help?
- Reach out via our Slack Community
- Or email us at [email protected]
- Found a bug? Please report it via GitHub Issues